crossgeared.com

Posts Tagged ‘UK-14’er’

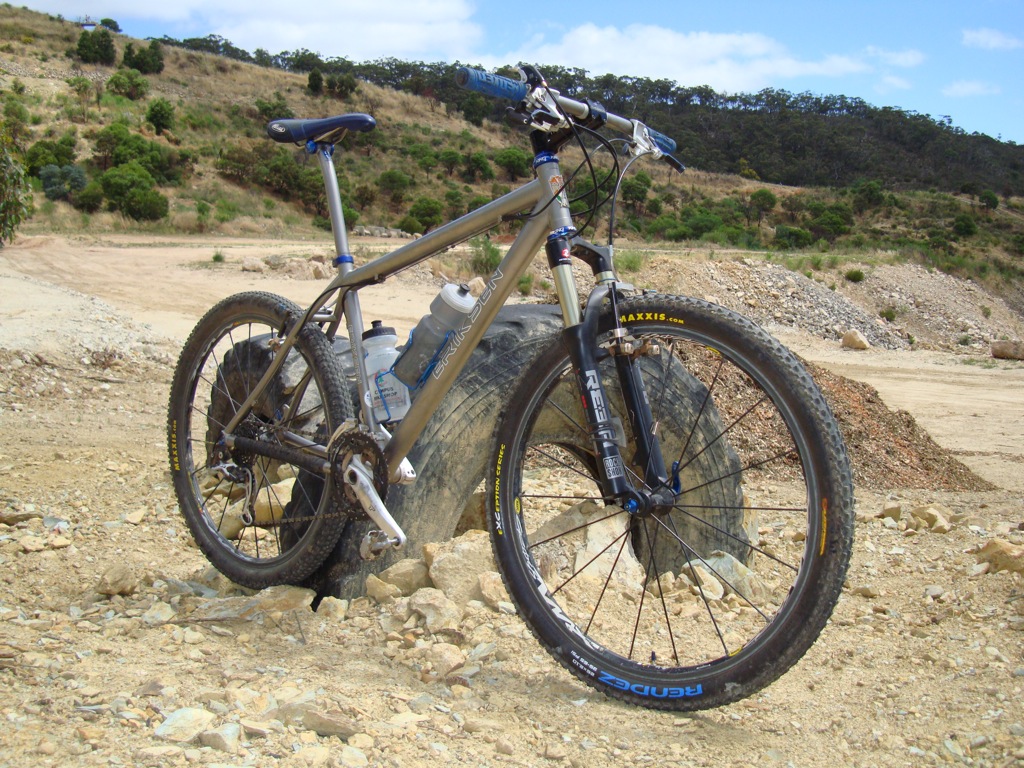
UK-14’er: Disc Brake Upgrade

Wednesday, January 27th, 2010

If you read the last post about the UK-14’er, you’ll know that I’m done with my Paul’s Motolite brakes.  And, if you look at the photo above, you’ll see that the UK-14’er no longer has Paul’s Motolite brakes.

As luck would have it, Eric sent me some BB7 disc brakes.  Apparently, he was very impressed with the BB7s on his Turner Burner and wanted to share.  Or, perhaps he was tired of my endless emails about nearly every disc brake system available.  Whatever the case, his timing was good as I was getting quite fed up with the Motolites.

The BB7 is a mechanical disc brake, as opposed to hydraulic, so it is simple, and more likely to be reliable.  On the downside, BB7s are slightly heavier than most hydraulic brakes, and significantly heavier than the Motolotes.

If you’ve been around mountain biking or mountain bikers much in the past decade or so, you would have likely heard an argument or two regarding hydraulic and mechanical disc brakes.  Here is my stance:  hydraulic disc brake systems generally get redesigned and dramatically changed every couple years.  The BB7 has been around in a largely unchanged state since 1999.  This tells me that the bicycle hydraulic brake (even over a decade into its existence) is still in the early stages of development.  In contrast, the BB7, widely viewed as ‘The’ mechanical disc brake, has only seen minor updates and is a mature technology and product.  I almost convinced myself to get some XT or Elixir CR brakes, but I didn’t see either option ending well.  But, my indecision was no longer a problem when the BB7s arrive on my doorstep.

Anyway, back to the upgrade.

First, the brakes:

  • Avid BB7 disc brakes (front & rear)
  • Avid Cleansweep X rotors, Ti bolts (185mm front, 160mm rear)
  • Avid Straight Jacket brake cable set (full length housing)

Next, the old Mavic Crossmax XL and ST wheels were not disc-compatible, so here is the new custom wheelset from Chain Reaction Cycles:

  • Hope Pro II 32h hubs
  • Mavic XM819 Disc UST rims
  • DT Swiss Competition 2.0/1.8mm spokes
  • DT Swiss Pro-lock nipples

That only leaves us with what was removed.  Again, another list:

  • Paul’s Motolite brakes (front & rear)
  • V-brake bosses (front & rear)
  • Old brake housing and cables
  • Mavic Crossmax XL wheel (front)
  • Mavic Crossmax ST wheel (rear)

The v-brake boss removal from the frame and fork was much easier than expected.  Both bosses came out easily with the help of a very short 8mm open-ended wrench.  I’ve read reports of very stubborn brake bosses whose removal required heroic efforts.  Luckily, in my case all of the bosses came out with minimal effort.  I left the frame bosses empty, and covered the fork bosses with black vinyl electrical tape.

The BB7s and Straight Jacket cables are fairly standard.  The cable housings are run full-length, front and rear, and the BB7s are using the standard ‘sintered’ brake pads and mounting hardware. The cable install is very simple, and as with v-brakes, it is important to cleanup the housing ends and verify that there are no sharp edges or burs that may interfere with cable travel.  I followed the included instructions from SRAM, along with some advice from the BB7 Setup video, also from SRAM.

The Cleansweep X rotors are from the new Avid XX disc brakes.  While the two-piece Cleansweep X rotors don’t really have much performance benefit over the standard ‘Rounagon’ rotors, they do look a lot better.  And besides, what good is going to discs if they don’t look cool?  The cool-looking Cleansweep X rotors are mounted with Ti hardware, which is supplied with the rotors, and is also cool.

I kept the Paul’s Love levers.  I really like the feel of the levers, and despite my dissatisfaction with their customer service, Paul’s does make some very nice parts.

The wheelset uses Mavic XM 819 UST Disc rims, which are similar to the ‘standard’ Mavic XC rim, the XC 717, but add UST tubeless compatibility, 2mm of width, and about 55g per wheel.  While keeping a true and straight rim with discs isn’t as critical as it is with rim brakes, the XM 819 rims do look fairly stout.  As a UST-compatible rim, the XM 819 will require no kits, sealant (supposedly) or anything else if I ever decide to try tubeless tires.  However, I’ll probably try non-tubeless tires with sealant and see how it goes.

The Hope Pro II hubs are also new to me.  I like the reliability of XT hubs and the sound and performance of the Mavic hubs.  Hopefully the Hope hubs will deliver on both of these measures with the added benefit of being very light and very blue.  From what I’ve heard so far, the Hopes will not disappoint in the ridiculously-loud-freewheel department.

The spokes and nipples are from DT Swiss.  The spokes are the light-but-not-too-light ‘Competition’ 1.8/2.0mm variety.  The nipples are DT Swiss Pro-Lock brass and should hopefully make for a strong and reliable wheel.

So, now we come to the downside of discs.  Prior to the changes, the UK-14’er weighed 10.325kg (22.76 lbs). With the new brakes and wheels, the weight is 10.935kg (24.1 lbs), with the same tires and standard tubes.  While all of this additional 610g (1.3 lbs) cannot be directly contributed to the disc brakes, the bulk of it can be as the new wheelset (on paper) only weighs about 76g* (.17 lbs) more than the old wheelset.  In addition to the above list of removed part, I also removed the rarely-used Pop-Loc from the fork, which weighed 70-75g (Pop-Loc, cable and housing).  On the bright side, I’m going to try the Larsen TT tires tubeless.  This could save 300-350g (0.75 lbs), but I’m guessing with sealant and valve stems, the weight savings will be closer to 200-250g (0.5 lb).

*-The difference between the two wheelsets is actually 116g, but the XM 819 rims do not use rim tape, which I estimate at 40g.  The Crossmax wheels required rim tape as the inner surface was uneven and punctured tubes.  Crossmax weights are  from Mavic.  The Hope Pro II / Mavic XM 819 UST Disc wheelset weight is from the Speedgoat Custom Wheelset Builder.

For those who are really interested in tables and data, this is for you:

WheelWeight (g)
Mavic Crossmax XL (front)738
Mavic Crossmax ST (rear)915
Mavic Crossmax XL/ST Wheelset1653
Hope Pro II / Mavic XM 819 UST Disc Wheelset1769

Since I just installed everything and really haven’t had a chance to even break-in the brakes, I’m going to leave my riding impressions of the brakes and wheelset for a future post.

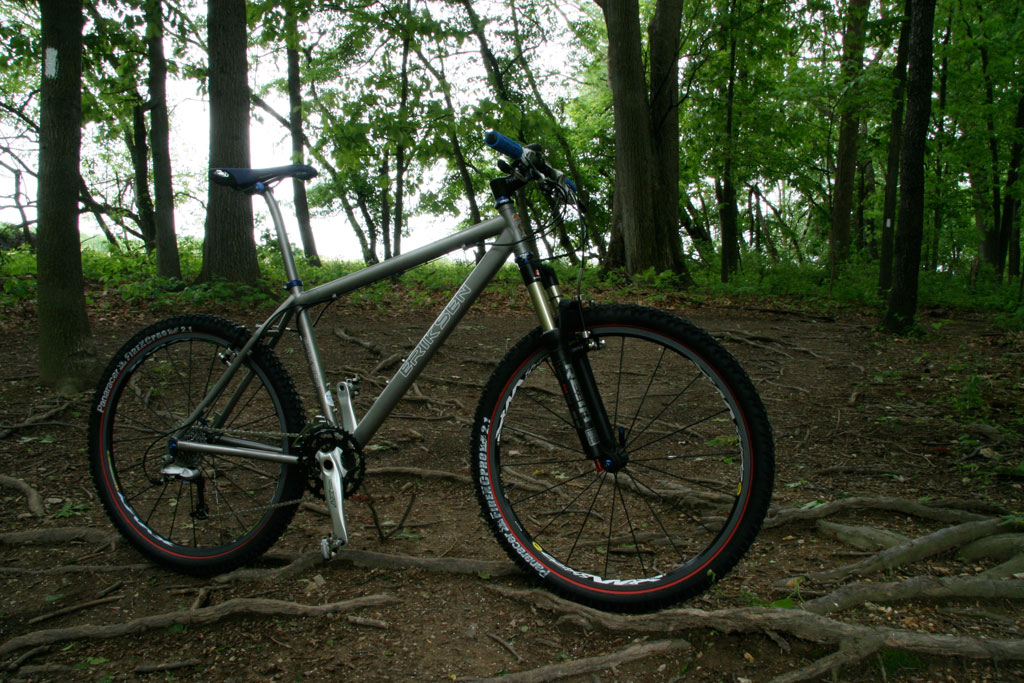
UK-14’er: When Brakes Break

Friday, January 1st, 2010

I’ve always liked v-brakes.  They are simple, they work, and they are reliable.  But, recently I’ve been having some issues with my favorite v-brakes, my Paul’s Motolites.

Chipped Ceramic

The first problem really isn’t a problem with the brakes, but more the wheels.  I managed to flat-spot the rear Crossmax ST on the UK-14’er (aka Kent Eriksen Ti Hardtail).  While this could easily be attributed to ‘user error’, the result is that the nice ceramic brake surface coating chipped off of the rim where it was bent.  The rims are subjected to a lot of potential damage, and this was the result.  I suppose it is really only a matter of time until you ding a rim, and if they are ceramic, you may lose some of it.

Looking more closely at my rims, it is clear that there are dozens of scratches and chips in the ceramic braking surface.  Most chips are small and haven’t spread (apart from the flat-spot), and the brakes still work quite well, but it is quite annoying as new ceramic rims are very expensive.  The rims for Mavic Crossmax rim-brake wheels are even more expensive (along with most of the other proprietary parts that comprise a Crossmax wheel) and subsequently the replacement parts cost far more than a replacement wheel.  So, the result is that if I want to fix my rim, a new wheel, or likely wheelset, is the most cost-effective solution.

The second problem I had was with the Motolites, specifically with the brakes and the brake cable housing.  First, a lesson on brake cable housings and how they work:

A brake cable housing consists of a hollow steel core coated with a plastic outer casing.  At each end of the housing there is a metal ferrule (cap).  Most cable housings also have an plastic liner inside of the steel core to reduce friction between the brake cable and housing.  The inner steel core provides the strength of the housing.  When the brakes are applied, the cable is pulled through the housing, and the housing is compressed between the brake lever and the brake.

Anyway, on a Motolite brake, the cable passes through a bent metal tube called a ‘brake noodle’ prior to attaching to the brake.  The brake housing terminates at the ‘brake noodle’.  However, the hole in this ‘brake noodle’ for the cable appears to be a large enough diameter that the steel core of housing can pull through the ferrule and into the ‘brake noodle’ (See the above photo). This effectively shortens the housing length and renders the brake non-functional.

If you look at the ferrule below, you’ll see the result of the above brake housing steel core passing though it.  I believe that the ferrule likely failed because it was supporting the full force of the front brakes due to the size of the hole in the ‘brake noodle’.  This failure has happened to me twice.  If you’re interested, I’ve tried shop bulk cable housing and Jagwire housing as well as a few types of ferrules, but the results have been the same or similar.

I contacted Paul for a solution, but I did not get a response.  Honestly, I am pretty disappointed with them.  Their parts are usually very nice and not inexpensive.  To put it kindly, their customer service leaves a lot to be desired.

On the bright side, I found that the old-style Motolites use a different ‘brake noodle’ that does not use a ferrule, but instead has a nicely machined piece that fits between the cable housing and the ‘brake noodle’. I put one of these old-style ‘brake noodles’ on the front brake and I haven’t had any more problems.

See the ‘old style’ above and right, and the ‘new’ above and left.  The smaller outer diameter of the ‘old style brake noodle’ has the added benefit of not rattling against the ‘hooked canoe’.  Great terminology, huh?

However, as you may have guessed, I’m not too happy with these brakes.  While the brakes are working (for now), I have a better, bluer, and titanium-er solution in progress…

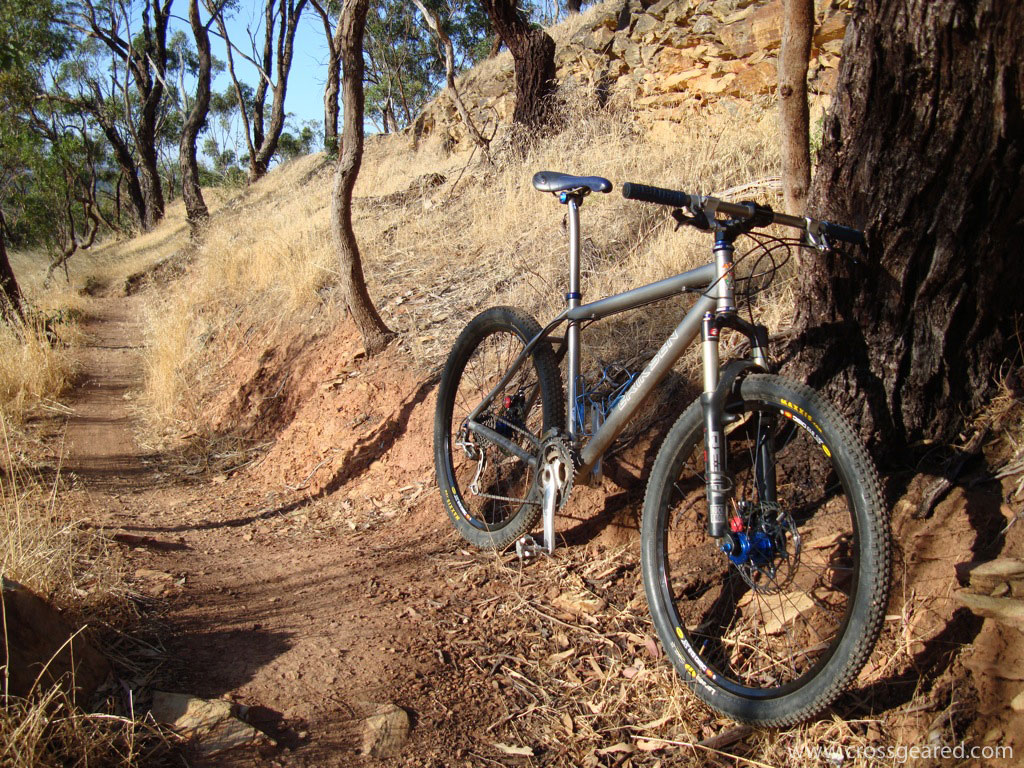
UK-14’er: One Year In

Thursday, July 30th, 2009

The new UK-14'er

The New UK-14’er

I’ve had the UK-14’er for a little over a year now. The bike has been great, and I’ve ridden it in Maryland, Virginia, Utah, Colorado, and South Australia. It was in Missouri for a couple days as well, but only saw a parking lot. I really don’t have any complaints. Aside from the parts I broke or wore-out, the bike has been a lot of fun and very reliable.

The UK-14′er at One Year

The UK-14’er at One Year

Anyway, here is a list of what I broke, wore out, or just decided to replace in the past year:

Replaced due to wear

  • 3x chains: One Wippermann 908 and two Shimano HG93
  • Middle chainring: The original Shimano XT ring was replaced with an LX ring
  • Cassette: The well worn SRAM PG990 (taken off of the M2) was replaced with an XT cassette
  • Freehub: The Mavic freehub was serviced and replaced per Mavic’s recommendations
  • 6x tires: 4x Panaracer FireXC, 2x Hutchinson Toro XC, plus many tubes
  • Brake pads: 2x rear, 3x front with a mixture of Avid and Kool Stop ceramic pads (Kool Stops are better)

Replaced due to damage

  • Handlebar: Kent Eriksen bar replaced the Titec titanium bar that got ripped in Moab
  • Rear derailleur: Shimano XT Shadow replaced the older (c. 2002) XT derailleur taken from the M2
  • Derailleur hanger: The derailleur snagged a shrub and tweaked the original. I now have a couple spares.
  • Computer: A Knog NERD replaced a Sigma BC1600 that was damaged in a crash

Replaced due to the rebuild after arriving in Australia

  • Brake and shifter cables were all replaced as well as the brake housing

Replaced for no good reason

  • The Chris King stem cap was replaced with one from the Poison Spider bike shop in Moab
  • The Minoura blue anodized bottle cages were taken off for a while and replaced with King stainless cages due to the bottle tearing up the Minoura cages. Later I found some blue anodized Specialized cages, but they turned out to be crap. The Specialized cages wouldn’t hold a bottle and were quickly mangled by use and crashes. The Minoura cages are back on for now.
Creative Commons License
www.crossgeared.com is licensed under a Creative Commons Attribution-Noncommercial-Share Alike 3.0 Unported License