crossgeared.com

Posts Tagged ‘Automator’

Automated Image Resizing in OS X: Take Two

Monday, February 8th, 2010

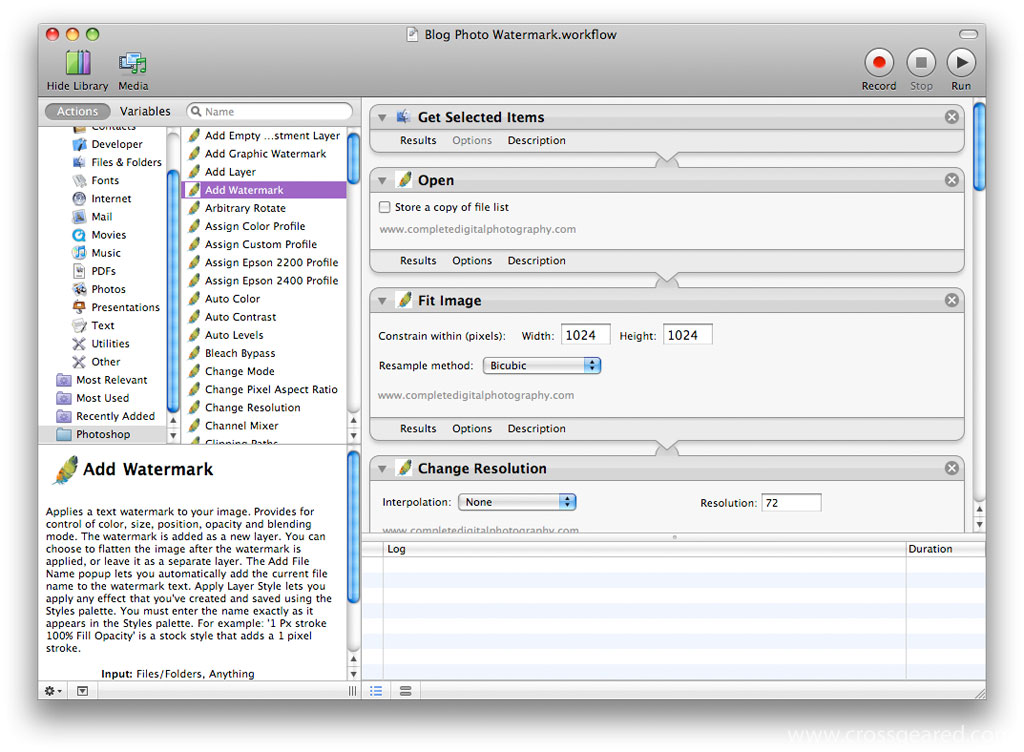
Behind-the-scenes blog update: Until recently, I was using this Automator script to process my digital photos for posting on the blog. This script uses the image manipulation tools built into OS 10.5 / Core Image.  These included tools are nice, and easy to use, but the result is an image file that is larger than it needs to be.

In an effort to reduce file sizes, I started using the free/donation-ware Photoshop CS3 Automator Action Pack from Complete Digital Photography.  These scripts use Photoshop for image processing, and as a result, the image files can be made smaller than those created using Core Image.  These scripts also allow the use of many of the tools in Photoshop, like adding watermarks and applying filters.

The obvious drawback of using these new scripts is that you need to have Adobe Photoshop CS3, which isn’t free or donation-ware.  While scripts for other versions of Photoshop are also available, CS4 isn’t one of them.  This isn’t a big deal for me, as paying to upgrade from CS to CS3 was traumatic enough that I haven’t even considered CS4.  Aside from that, the only other drawback I’ve noticed is that the processing time for each image is considerably longer than with the original script.  That said, the processing time for the above image was only about 20 seconds on a Mac Mini 2.0GHz Core 2 Duo and Nvidia GeForce 9400 (256MB).  Processing multiple images isn’t as bad as it appears, as the time per image in a batch process is much less than the time required to process a single image.

I have reprocessed all of the images from 2010 on with this new script, and the results are better than those made with the old script.  I may make some changes to the watermark, but overall, I’m happy with the results.

Automated Image Resizing in OS X

Thursday, April 2nd, 2009

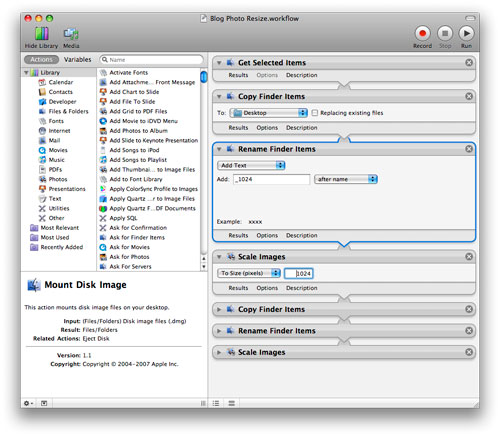
I’ve been resizing a lot of images for use on this and other blogs recently. This can be quite tedious and time consuming.

Originally, I was using Photoshop CS3 to open, resize and save the images in a 1024px max width and a 500px max width and appending the appropriate resolution to the end of the image filename. This is a repetitive, predictable and easily scriptable action.

OS X includes a utility called Automator that lets you take these repetitive steps, put them in a workflow, and then save and apply this workflow. The general algorithm for this image resize workflow is pretty simple and straightforward.

This workflow takes one or more images files as input and outputs two image files in same folder as the original images for each source image with the long-side resolution appended to the end of the respective image file.

Update: I just resize to 1024px and the newer versions of WordPress resize the version you see in the post to 500px.

Automator

Here is the algorithm with [Automator action]:

1.  Apply this workflow to the selected Finder items (i.e. select the images to be resized in Finder) [Get Selected Items]

2.  Duplicate the images so the original(s) are not overwritten [Duplicate Finder Items]

3.  Rename the duplicated files: remove the ” copy” text that was added in the filename duplication step and replace it with something meaningful like the resolution [Rename Finder Items]

4.  Resize the image: set the resolution of the long side of the image to a specified size (1024px) [Scale Images]

5.  Duplicate the image so the 1024px version is not overwritten [Duplicate Finder Items]

6.  Rename the duplicated files: remove the “resolution copy” text that was added in the last rename and filename duplication step and replace it with the new resolution [Rename Finder Items]

7.  Resize the image: set the resolution of the long side of the image to a specified size (500px) [Scale Images]

This algorithm will work well only if first, the original file has dimension larger that the resolution specified in the first resize operation, and second, the second resize operation size is less than the size specified in the first resize operation.

Automator Menu

Finally, once your satisfied your workflow works you can ‘Save As Plug-In…’ from the Automator File menu, save it as a Finder Plug-In, and now it is available from the context menus in Finder. This makes the workflow convenient and simple to find and use.

This is a pretty long description of a fairly simple process, but I haven’t had any wordy posts recently. Anyway, on to the results: taking a sample image and applying the resize operations manually with Photoshop CS3, using the Save for Web and Device operation with an output format of jpeg with 60% compression results in a 108K 1024×683 image and a 32K 500×333 image. The same operation using my Automator script results in a 140K 1024×683 image and a 44K 500×333 image. See the results for yourself:

Photoshop resize (click for 1024px wide version):

Photoshop Resize

Automator resize (click for 1024px wide version):

Automator Resize

Creative Commons License
www.crossgeared.com is licensed under a Creative Commons Attribution-Noncommercial-Share Alike 3.0 Unported License