• Depreciation

    We recently sold our 2003 Accord. While this wasn’t the best time to be selling a car, we didn’t need this one anymore, and soon one with the steering wheel on the other side will be a lot more useful. Anyway, the depreciation on the Accord seemed a little high to me, so I compared it to some of the other cars we were considering at the time.

    It was July 2006, gas was around $3.00 a gallon and we were looking for a new car. The Honda Civic and Fit were on the list, but due to high fuel costs and their recent release, both were quite popular and hard to find. Aside from these two, we were also looking at 4-cylinder Accords. The 4-cylinder Accord with an automatic was surprisingly shockingly lethargic, so we drove a V6. And, that is how we went from considering a 109 hp Fit to buying a 240 hp Accord V6.

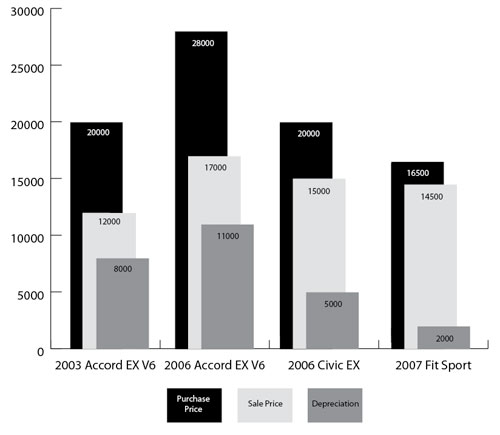
    Now it is three years later. How would we have done with the Fit or a Civic? Well, I took the rough sale price of the Accord and compared it to the other cars we considered. The current value of the other cars was determined using the Kelly Blue Book value with the mileage from the Accord and an average of the ‘good’ and ‘excellent’ conditions. Here are the results:

    Honda Depreciation, 2006-2009 (USD)
    Honda Depreciation

    It appears as though the Fit would have been the best purchase as it had the smallest initial purchase price and the least amount of depreciation. The Civic followed the Fit, and then our Accord and finally the then-new Accord. One caveat is that our Accord was purchased as a ‘Certified Used’ car and was on the high end of what it should have cost in 2006. Was paying for a certified car a good idea? Maybe. While the Accord had exactly zero problems during the three years we owned it, I would have expected the same from a lowly un-certified Accord.

    What is my conclusion? I’m not sure. It is clear that the then-new Accord would have been the most expensive to own, and the 2003 we bought was a better buy. The comparison between the Accord and the Civic and Fit is a bit murky. Objectively, the Fit would certainly have been the cheapest to own. While I’ve read good things about the Fit Sport with a manual transmission, something about an automatic and 109 hp does not sound appealing. Having suffered an automatic transmission these last three years, I am glad we had the V6 instead of the four-cylinder options. I suppose ones tolerance of automatic transmissions would determine if that extra $3-6k of depreciation was worth it.

    As luck would have it, the Insurance Institute for Highway Safety (IIHS) recently compared the Accord and Fit. While thier creiteria are a little different, they are of the opinion that the Accord is the right choice.


  • New Apples

    Mini Core 2 Duo

    I couldn’t resist. I saw that shiny Apple store in one of those new Microsoft commercials and had to get another Mac.

    I chose a the base model Mac Mini, and added some upgrades. These new Mac Minis are a departure from the previous generations in that the base model is identical to the more expensive models with the exception of easily upgradable components: the hard drive and the memory. This was nice considering the last Mini I purchased topped $1000 and this one came in under $550 (okay, $1 under $550). The most compelling feature for me is the dual monitor support, closely followed by the 4GB RAM capacity and inclusion of Firewire 800.

    What you’re looking at above is the new Mini about five minutes after taking it out of the box. With practice the cases aren’t too hard to open, and once open they are easy to work on. This Mini received the 500GB 2.5″ SATA drive out of the old 1.66GHz Core Duo Mini and 4GB of Crucial DDR3/1066 memory for $55 from Newegg. A comparison of my now three Mac Minis:

    Mac Minis

    I’m only going to keep two of them, so I’ll have to decided between a trusty PPC G4 or the faster, more feature-laden Intel…


  • Automated Image Resizing in OS X

    I’ve been resizing a lot of images for use on this and other blogs recently. This can be quite tedious and time consuming.

    Originally, I was using Photoshop CS3 to open, resize and save the images in a 1024px max width and a 500px max width and appending the appropriate resolution to the end of the image filename. This is a repetitive, predictable and easily scriptable action.

    OS X includes a utility called Automator that lets you take these repetitive steps, put them in a workflow, and then save and apply this workflow. The general algorithm for this image resize workflow is pretty simple and straightforward.

    This workflow takes one or more images files as input and outputs two image files in same folder as the original images for each source image with the long-side resolution appended to the end of the respective image file.

    Update: I just resize to 1024px and the newer versions of WordPress resize the version you see in the post to 500px.

    Automator

    Here is the algorithm with [Automator action]:

    1.  Apply this workflow to the selected Finder items (i.e. select the images to be resized in Finder) [Get Selected Items]

    2.  Duplicate the images so the original(s) are not overwritten [Duplicate Finder Items]

    3.  Rename the duplicated files: remove the ” copy” text that was added in the filename duplication step and replace it with something meaningful like the resolution [Rename Finder Items]

    4.  Resize the image: set the resolution of the long side of the image to a specified size (1024px) [Scale Images]

    5.  Duplicate the image so the 1024px version is not overwritten [Duplicate Finder Items]

    6.  Rename the duplicated files: remove the “resolution copy” text that was added in the last rename and filename duplication step and replace it with the new resolution [Rename Finder Items]

    7.  Resize the image: set the resolution of the long side of the image to a specified size (500px) [Scale Images]

    This algorithm will work well only if first, the original file has dimension larger that the resolution specified in the first resize operation, and second, the second resize operation size is less than the size specified in the first resize operation.

    Automator Menu

    Finally, once your satisfied your workflow works you can ‘Save As Plug-In…’ from the Automator File menu, save it as a Finder Plug-In, and now it is available from the context menus in Finder. This makes the workflow convenient and simple to find and use.

    This is a pretty long description of a fairly simple process, but I haven’t had any wordy posts recently. Anyway, on to the results: taking a sample image and applying the resize operations manually with Photoshop CS3, using the Save for Web and Device operation with an output format of jpeg with 60% compression results in a 108K 1024×683 image and a 32K 500×333 image. The same operation using my Automator script results in a 140K 1024×683 image and a 44K 500×333 image. See the results for yourself:

    Photoshop resize (click for 1024px wide version):

    Photoshop Resize

    Automator resize (click for 1024px wide version):

    Automator Resize